Showing posts with label risograph. Show all posts

Sunday, 12 April 2015

Moving forward

I’ve been working but haven’t got much in the way of pictures to share this week.

The long collagraph plate worked - 6 prints and 6 ghosts. Unfortunately I forgot to photograph any before I put them under weights to dry.

I’ve finished the mock up for the other book I was thinking about, also using collagraphs. It’s at the scrap paper and scribbles stage, so not very pretty.

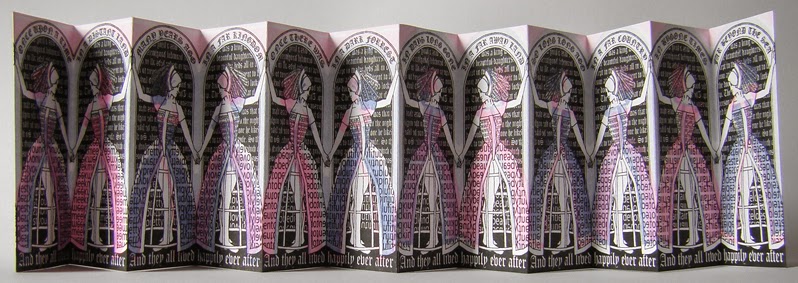
But I did cut and assemble the coloured ‘Twelve dancing princesses’ risograph prints. The offset colour looks almost deliberate when you see them all standing together. 


Saturday, 28 February 2015

Plan C

The more scanned drawings I added to the text the more it reminded me of old kitsch wallpaper (the sort with views of Tuscany interspersed with peppers and Chianti bottles). Time for Plan C

The object of the exercise was to experiment with the printer so I decided to see how I could use it to add text to pre-prepared papers. I made several different coloured surfaces using watercolour and water-soluble crayons on cartridge paper, and when dry I ironed them flat. 


Some work better than others, the salt is too busy 


but the cling film is really effective as a background.


I also revived the artwork from an old idea for a book. ‘Twelve Dancing Princesses’ is meant to have the feel of traditional fairy story imagery, princesses and delicate colours, but if you look at the text that makes up the pattern on their dresses it picks out the qualities that seem to apply to the ‘heroines‘ of many fairy stories (eldest, youngest-the middle child never seems to do anything remarkable, kind, meek, dutiful-nothing wrong with them as qualities on their own but put together its a depressing role model for girls)
I printed some in black only to hand colour later....


and some in blue and pink as well. 


The Barbie colours fit the subject matter. The colour is miss registered which I quite like. It fits the disparity between the feel of the artwork and its commentary.

The printer uses soy ink which will take a while to dry completely before I can start to cut and assemble the books.

Friday, 6 February 2015

Printed Shops

My wonderful kids bought me membership of the Hot Bed Press for Christmas so yesterday I took my colour separations to play with the risograph.
It took a while to remember how to use it (I couldn’t find my notes from last September’s workshop) but eventually I managed a rack of prints.

Just black ....

2 colour separation in different colour ways (I had anticipated using yellow and black to echo the belisha beacon on the zebra crossing but there wasn’t any yellow ink)....

And three colour separation.

There are restrictions with the process. Registration isn’t completely accurate (though you can fiddle with placing the overlapping colours a bit) and colours are limited (I'm going to have to avoid the temptation to overuse this glorious pink) but I'm thoroughly enjoying using it. I want to try two sided printing next.

Thursday, 29 January 2015

Another shop

It wasn’t until I looked at the drawing here on the blog that I realised the perspective lines in the paving stones were going the wrong way. A bit of Photoshop later and they looked better. I’ve also used some photos I took locally as a starting point for another shop.


I added flat colour to both and now have a set of colour separations ready for the risograph. I’m hoping they will look similar to lithographic illustrations when finally printed

Wednesday, 5 November 2014

Patience is a virtue...

And one I don’t possess in great quantity.


I did cut and fold the risograph print to make a zine. Although this particular piece is rather garish, and there are mistakes in the separation/layering, as an exercise in learning about the machine I think it was worth it and I would like to investigate locating one that I can get access to push this further. 


Now back to patience. I have already posted the images of eight pieces of plate with a peel n blue resist applied ready to produce two different four colour etchings. To save time I decided it would be a good idea to bite them all at the same time and then do a major printing session.

When I came to print I realised that the plates weren’t properly degreased. The copper sulphate had bitten into the exposed aluminium at random just giving deep spots across the plate. Any detail I managed to get was coming from the resist which I’d left on the plate (it’s really difficult to remove  but does seem to print OK – usually!) but it is so shallow that I cannot get any depth of colour from it.
 The red plate printed best and you can see some detail (and the red spots from the deeper etch)

The two coloured version gives a vague idea of what I’m trying to do but it is too pale and looses a lot of the detail. (The light I'm taking these photos in isn't helping either)
With eight ruined plates and no way to rescue them I think I’ll go back to gum arabic again for this image.

Friday, 24 October 2014

Risograph Prints

The Manchester Artists Book Fair was well worth a visit. This year I went not only to see what was for sale but also with the idea of sussing it out with a view to trying to have a table myself next year.

I came away with more idea of how to display work and sensible pricing. As well as several books to add to my slowly growing collection. I’m not sure that I’ll manage to produce enough work to stock a table on my own but it gives me something with a concrete deadline to aim at.

Hot Bed Press (who organise the Book Fair in conjunction with MMU) were giving a series of book related workshops. I had booked myself onto the risograph/zine  morning. I spent the week before scanning , photoshopping and tying myself in knots with colour separation. I finally produced a three colour print which, when it dries, will form a beak book. The colours are a bit garish but I wanted to be able to see the separation of layers clearly for this first experiment.
Because the risograph uses soy ink the prints will take a while to dry. So I finally made a drying rack so that I’m not covering every available surface with drying prints 
 Though I do have to find two bits of furniture to hang the bar from when it’s being used.